Every developer has watched a Docker build grind through a full dependency download because they edited one line of application code. The fix is usually two lines moved, and it saves minutes per build. If you write a Dockerfile without thinking about layer caching, you are paying a tax on every commit, every CI run, and every deploy. The principles behind that tax, instruction ordering, cacheable units, base image selection, and verification, are stable across Docker versions. They will outlast whatever version you are running today.
The core problem is sequential: the Docker build cache invalidates at the first changed instruction and rebuilds everything after it. If you copy your source code before installing dependencies, any file change busts the cache for the dependency step, and you re-download every package. Reordering those two steps can cut rebuild time by 81 percent, from 37.4 seconds to 7.1 seconds in a benchmark by Depot, a container build infrastructure company.
The first lines of a Dockerfile
The first instruction is always FROM, and it sets the base image. Everything that follows builds on top of it. Docker's own best practices guide is blunt about this: use official images when possible, because they are maintained, scanned, and updated regularly.
After FROM, the next lines should establish the working directory and copy only the files that declare your dependencies. For a Node.js project, that means COPY package.json package-lock.json ./ before any source code. For Python, COPY requirements.txt . before COPY . .. The Docker documentation explains that filesystem-changing instructions like RUN, COPY, and ADD each create a layer, and Docker checks each instruction top to bottom. If an instruction and everything before it are unchanged, Docker reuses the cached result.
Here is the minimal shape of a well-ordered Dockerfile for a Python application:
FROM python:3.12-slim
WORKDIR /app
COPY requirements.txt .
RUN pip install --no-cache-dir -r requirements.txt
COPY . .
CMD ["python", "app.py"]
The requirements.txt copy and pip install form one cacheable unit. When you change application code, Docker reuses the cached pip install layer and only rebuilds from COPY . . onward. Better Stack's Docker guide uses the same pattern and notes that the dependency layer stays cached as long as your package files have not changed, even if your source code has.
The first lines should never copy everything. Docker's guide explicitly warns against COPY . as a broad pattern, because any change to any copied file breaks the cache. Be specific about what you copy and when.
Instruction order and layer caching
The golden rule, repeated across every primary source on this topic, is to order instructions from least to most frequently changing. Docker's own guide frames it as cacheable units of execution: each RUN instruction is a cacheable unit, and you want to separate things that change often from things that change rarely.
The optimal ordering, as described by OneUptime's analysis, follows this hierarchy:
- Base image (
FROM) changes almost never - System package installation (
RUN apt-get install) changes rarely - Dependency file copy (
COPY package.json) changes when dependencies change - Dependency installation (
RUN npm ciorpip install) changes when dependencies change - Application code copy (
COPY . .) changes with every commit - Build commands that depend on source (
RUN npm run build) change with every commit
The expensive step is usually dependency installation. A full npm ci can take 30 to 60 seconds. If you copy package.json and package-lock.json first, run npm ci, and only then copy source, the cache survives code changes. freeCodeCamp's guide puts it simply: if any layer's cache gets invalidated, every layer after it rebuilds from scratch, even if those later layers have not changed at all.
Depot reported that reordering the Dockerfile instructions cut rebuild time by 81 percent, from 37.4 seconds to 7.1 seconds. The builder reused the cached npm ci layer when only application code changed and the package manifest files remained unchanged.
There are two subtleties that catch people. First, chaining all commands into one RUN instruction can bust the cache, because any change to any command in the chain invalidates the whole layer. Docker's guide recommends grouping logically related commands, like updating the package index and installing packages in the same RUN, but keeping unrelated steps separate. Second, if you install system packages, pin versions. Unpinned apt-get install commands risk pulling in outdated or incompatible packages on the next cache miss.
A second pattern worth using is multi-stage builds. Docker's guide recommends multi-stage builds to remove build dependencies from the final image. You compile and build in one stage, then copy only the artifact into a minimal runtime stage. The build tools, compilers, and intermediate files never make it into the image you ship. This matters for both image size and security surface area, and it is the same principle that makes Docker containers distinct from virtual machines: you carry only what you need to run, not a full OS.
Full, slim, alpine or distroless
Base image choice affects image size, compatibility, and security surface. Depot's guide lays out the tradeoffs clearly with approximate size reductions. The slim variant is roughly 75 percent smaller than the full base image. The alpine variant is roughly 85 percent smaller.
The chart below compares the approximate uncompressed sizes of Node.js 22 base image variants:
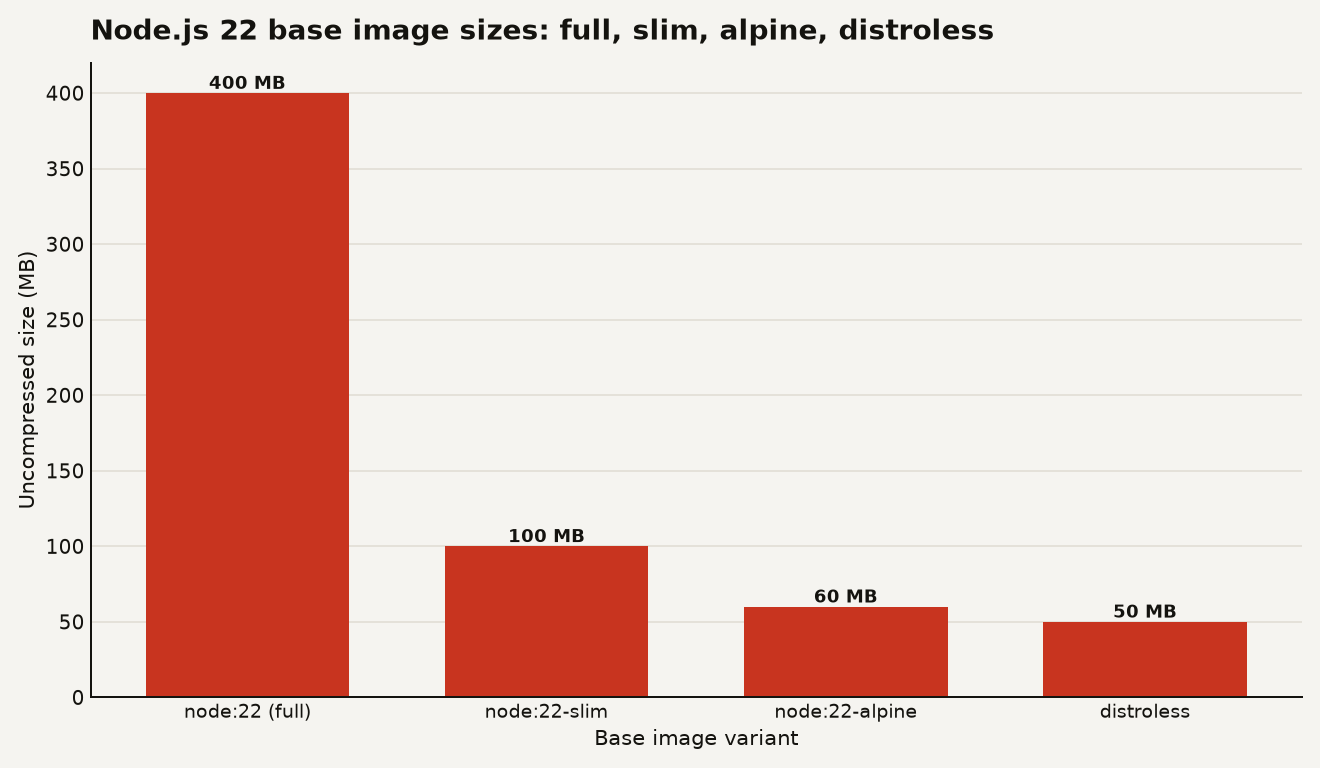
Here is the decision matrix:
| Image | When to use | Tradeoff |
|---|---|---|
node:22 (full) |
Development, build tools needed, native dependencies | Largest, ~400 MB uncompressed |
node:22-slim |
Production runtime, glibc compatibility needed | ~75 percent smaller, still Debian-based |
node:22-alpine |
Minimal production, size critical | Uses musl libc, can break native deps |
distroless |
Production, smallest attack surface | No shell, harder to debug, smallest image |
The critical compatibility trap is the libc difference. Debian-based images, including slim, use GNU libc (glibc). Alpine uses musl libc, which is smaller but can cause compatibility issues with native Node.js modules or pre-compiled binaries that expect glibc. Docker's guide notes this explicitly. If your application uses native dependencies, test Alpine thoroughly or stick with slim.
Distroless images, maintained by Google, go further than Alpine. They strip out the shell, package manager, and everything except the runtime your application needs. The GoogleContainerTools project documents this approach. You cannot docker exec into a distroless image and get a shell, which makes debugging harder but reduces the attack surface significantly. For production deployments where you have other observability in place, distroless is the right end state.
The practical path for most teams: develop and build on the full image, ship the runtime on slim or alpine, and move to distroless when your observability and debugging tooling can work without a shell inside the container.
Verify the image before pushing it
Building the image without errors does not mean it works. The image might start, bind to the wrong port, fail to find a file, or crash on the first request. You need to test the container, not just the Dockerfile.
The basic verification loop is build, run, and probe:
docker build -t myapp:local .
docker run -d -p 8080:8080 myapp:local
curl -f http://localhost:8080/health || exit 1
docker logs myapp-test
docker stop myapp-test
If your application has a health check endpoint, hit it. If it does not, add one. The HEALTHCHECK instruction in the Dockerfile lets Docker itself monitor the container's status, which orchestrators like Kubernetes and Docker Swarm read. A basic HEALTHCHECK CMD curl -f http://localhost:8080/health || exit 1 tells Docker to poll the endpoint and mark the container unhealthy if it fails.
For CI pipelines, run the container as part of the build step. Start it, wait for the health check to pass, run your integration tests against it, then tear it down. If the health check never passes, the build fails before it reaches the registry. This catches problems that a build success cannot: missing runtime dependencies, wrong file permissions, port mismatches, and environment variable errors.
Local testing also catches the Alpine musl libc issue early. If your build succeeds on Debian but fails on Alpine, you find out on your laptop, not in production. Run the same image variant locally that you intend to ship.
Image scanning is the second layer of verification. Tools like docker scout or Trivy scan the final image for known vulnerabilities in its packages. A small base image has fewer packages to scan and fewer vulnerabilities to surface. This is another reason to prefer slim or distroless over the full image: the full image carries hundreds of packages your application never uses, each a potential CVE.
The two-line fix that compounds
The Dockerfile is a build script, a deployment artifact, and a caching contract all at once. The single most impactful change you can make today is to move your dependency installation before your source code copy. It is two lines. It costs nothing. And across a team of ten developers pushing twenty commits a day, saving thirty seconds per build is 100 minutes of CI time saved per day. That compounds into real money and real velocity. Write your Dockerfile as if every layer costs you something, because in CI minutes and developer patience, it does.
Sources
- Docker blog - Intro Guide to Dockerfile Best Practices
- oneuptime.com - How to Order Dockerfile Instructions for Optimal Caching
- betterstack.com - Best Practices for Building Docker Images
- freecodecamp.org - How to Optimize Your Docker Build Cache
- depot.dev - Optimize your Dockerfile for 5x faster builds
- Docker documentation - Docker build cache
- GoogleContainerTools on GitHub - Distroless images