Snowflake's pricing model is simple on the surface (pay for compute credits, storage and serverless features) and surprisingly easy to get wrong in practice. A warehouse left running at 4XL over a weekend, a poorly partitioned table that forces full scans, or a serverless feature that bills per token can each add thousands of dollars to a monthly bill before anyone notices. The good news is that Snowflake gives you the controls to catch all three. The better news is that AI agents are starting to tune warehouses automatically.
The four controls that keep a Snowflake bill predictable are warehouse right-sizing, resource monitors, auto-suspend and budget alerts. If you configure these four correctly, you eliminate roughly 80 percent of the cost surprises that Snowflake teams report. The remaining 20 percent comes from storage optimization, data transfer governance and serverless feature cost monitoring, which require more ongoing attention.
Snowflake bills in credits
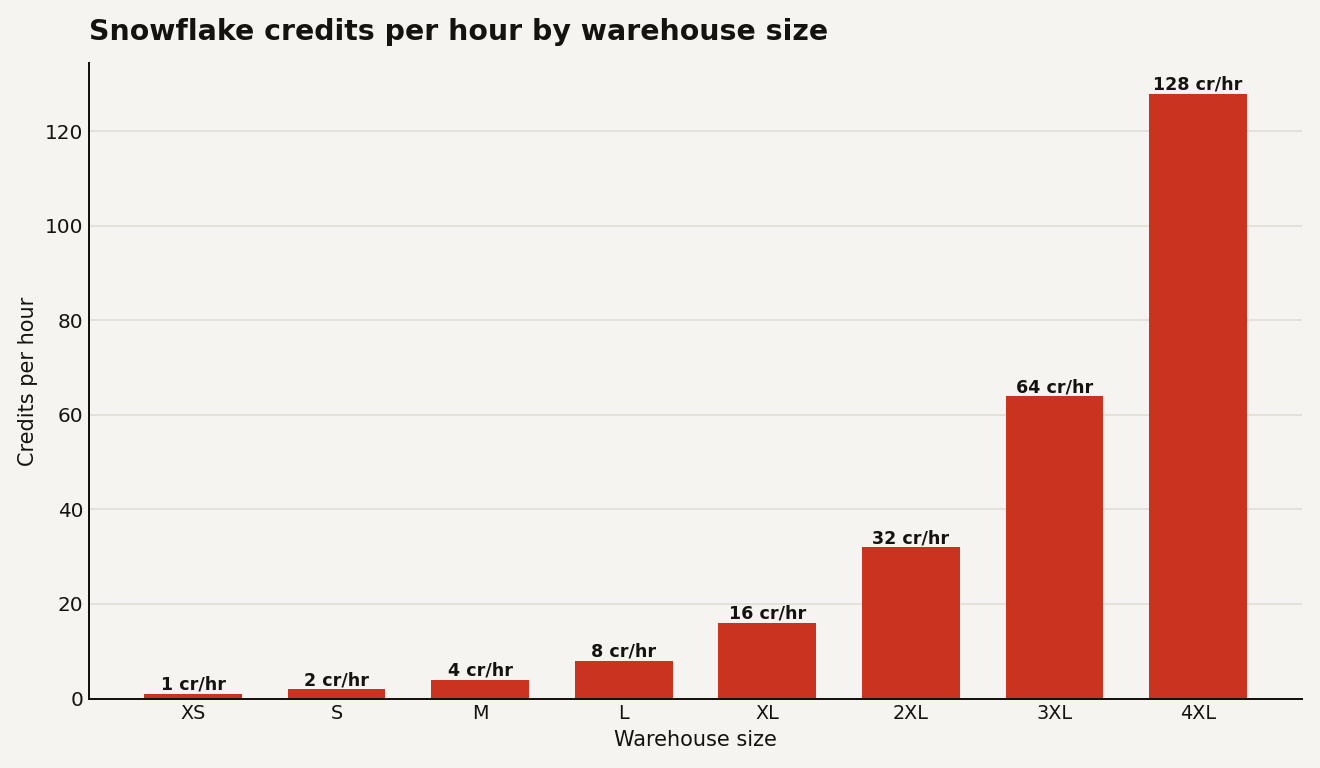
Snowflake bills in credits. One credit buys one hour of a single-node virtual warehouse, and larger warehouses consume credits at a multiplier: an X-Small warehouse burns 1 credit per hour, a Medium burns 4, an XL burns 16, and a 4XL burns 128. A 4XL warehouse left running for a full month costs 92,160 credits. At Snowflake's standard $3 per credit, that is $276,480. For one warehouse. For one month.
In a typical organization, virtual warehouse compute accounts for 50 to 60 percent of the total Snowflake bill. Serverless compute (Snowpipe, automatic clustering, materialized views maintenance, search optimization, and Cortex AI functions) accounts for another 15 to 25 percent. Storage (both active and Time Travel/Fail-safe) accounts for 10 to 20 percent. Data transfer, primarily egress to other clouds or regions, accounts for the remaining 5 to 15 percent.
The split matters because each category has different optimization levers. Warehouse compute is the easiest to control and the highest-ROI place to start. Serverless compute is the hardest to control because you do not directly manage the resources. Storage is cheap per terabyte but accumulates silently. Data transfer is expensive per gigabyte and architectural: once your data flows cross-region, the cost is baked into the design.
Four controls that work
Warehouse right-sizing is the single most impactful FinOps action on Snowflake. The pattern is simple: start with an X-Small warehouse, run your workload, check the query profile for spillage to local or remote disk, and increase the warehouse size only if queries are spilling. Most teams run warehouses that are one or two sizes larger than they need because they sized for peak concurrency rather than average load. Snowflake's QUERY_HISTORY view in ACCOUNT_USAGE tells you exactly how much of each warehouse's capacity is being used. A warehouse with average queued load below 0.1 and no spillage is correctly sized.
Multi-cluster warehouses add a second dimension: minimum and maximum cluster count. Set the minimum to 1 and the maximum to whatever your concurrency needs require. Snowflake auto-scales clusters within those bounds. The mistake teams make is setting the minimum to 2 or 3 "just in case," which doubles or triples the baseline cost.
Resource monitors are Snowflake's built-in cost guardrails for virtual warehouses. You set a credit quota (monthly, weekly, or custom interval), define up to five threshold percentages, and choose an action at each threshold: notify, notify and suspend, or notify and suspend immediately. A typical setup is: notify at 80 percent, notify and suspend at 100 percent. Resource monitors only apply to user-managed virtual warehouses. For serverless, you use budgets.
Auto-suspend is the simplest control and the one most frequently misconfigured. Snowflake's default auto-suspend is 10 minutes. Setting it to 1 or 2 minutes for non-production warehouses and 5 minutes for production warehouses saves 15 to 30 percent on warehouse compute with no impact on user experience. A warehouse that sits idle for 9 minutes between queries burns credits for 9 minutes. Over a month, those 9-minute gaps add up.
Budgets are the serverless counterpart to resource monitors. A budget sets a monthly spending limit on a group of resources (specific warehouses, serverless features, or the entire account) and sends a notification when spend is forecasted to exceed the limit. Budgets can notify via email, Slack webhook, Microsoft Teams webhook, Amazon SNS, Azure Event Grid, or Google Cloud Pub/Sub. They do not suspend resources automatically, which is a deliberate design choice: serverless features often serve critical pipelines, and an automatic suspension could break a production data load.
Storage at $23 per terabyte per month
Snowflake storage costs $23 per terabyte per month for compressed storage in most regions. That is cheap enough that storage is rarely the largest line item, but it accumulates in three ways that teams miss.
First, Time Travel retains data for a configurable number of days (default 1, maximum 90). Every day of Time Travel adds storage cost. For tables that are rebuilt daily by a pipeline, set Time Travel to 0 or 1 day. For production tables that need point-in-time recovery, keep it at 7 to 14 days.
Second, Fail-safe retains data for 7 days beyond Time Travel and is not configurable. It is free in the sense that you cannot turn it off, but it adds 7 days of storage cost to every table. The only way to reduce Fail-safe cost is to drop tables you no longer need.
Third, cloned databases and tables share storage with their source until either is modified, at which point they accrue their own storage cost. A team that clones a production database for testing and then runs a transformation on it has just doubled the storage cost of every modified table. The TABLE_STORAGE_METRICS view in ACCOUNT_USAGE shows exactly which tables are consuming storage and how much is active versus Time Travel versus Fail-safe.
Agents in Snowflake FinOps today
Snowflake provides the components for a dedicated FinOps agent: the ACCOUNT_USAGE and ORGANIZATION_USAGE schemas expose every cost-relevant metric through standard SQL views. An LLM agent that can query those views, interpret the results, and generate recommendations is a straightforward integration.
The highest-ROI agent use cases for Snowflake FinOps are warehouse right-sizing recommendations, unused table detection, and cost anomaly investigation. An agent can query QUERY_HISTORY for spillage and queue patterns, compare them against the current warehouse size, and recommend a smaller size with an estimated monthly savings. It can query TABLE_STORAGE_METRICS for tables that have not been queried in 90 days and flag them for archival or deletion. And it can monitor the WAREHOUSE_METERING_HISTORY view for cost spikes, correlate them with QUERY_HISTORY to identify the responsible user and query, and post a summary to Slack.
The FinOps Foundation's Snowflake coverage maps the standard FinOps capabilities onto data platforms specifically, and the pattern is the same as AWS: agents start with anomaly detection and reporting, then move into optimization recommendations, and eventually into automated execution within policy guardrails.
Query WAREHOUSE_METERING_HISTORY today
If you do nothing else, query the WAREHOUSE_METERING_HISTORY view for the last 30 days, group by warehouse name, and sort by credits consumed descending. Look at the top three warehouses. For each one, check the auto-suspend setting (SHOW WAREHOUSES), the size, and whether it is multi-cluster. Reduce the auto-suspend to 60 seconds for non-production warehouses. Reduce the size by one tier and monitor query performance for a week. Set a resource monitor with a monthly quota at 90 percent of last month's consumption.
Those three actions (auto-suspend, right-size, resource monitor) take 30 minutes and typically save 20 to 30 percent on warehouse compute. Everything else (storage lifecycle policies, serverless budget alerts, data transfer governance) builds on that foundation.
For the deeper warehouse sizing methodology, the Snowflake warehouse sizing guide walks through the query-profile approach to picking the right size. For the broader FinOps lifecycle, the overview covers where agents fit across all platforms.